
Google Adsense Referrals is a new program with the potential for top paying Google Adsense payouts. The Google Referrals program allows Adsense publishers to hand-pick the Adsense ads that they want to appear on their site, and get paid per action (i.e. sale or sign-up) rather than per click. In this way it is much like a traditional affiliate program (think Commission Junction or Amazon Affliates), where when someone makes a purchase or signs up for a service through your affilliate link, you get a commission.
There are some great options for customizing your Google Adsense Referrals links, starting with selecting any one of a number of ad boxes (including both text or image, just like regular Adsense), but also including their completely customizable text links. This is one of two ways that Google Referrals are a radical departure from regular adsense – you can customize the text links in any fashion you choose, to fully integrate them in with your site.
The other way that Google Adsense referrals depart from the traditional Google Adsense model is that you get to hand pick either the ads, or the category of ads. So, for example, perhaps you have a website about luggage, but really ads for travel services will do much better for you than will luggage ads. With Google Adsense referrals, you can select either a category – “travel” – or you can handpick ads for various travel agencies and services. There are quite a few categories from which to choose – and individual ads within each category – such as automotive, business, computers & electronics, entertainment, food & drink, health, and more. You can also search for ads by keywords!
Unfortunately, not all of the advertisers provide plain text links, which means that for those advertisers you need to use block ads. But even there, the ability to customize the size and color – and, most importantly, the advertiser – takes you much closer to earning dream payouts. Those of you who appreciated how the Yahoo Publisher Network let you customize your advertiser channels will really appreciate this.
Setting up your Adsense Referral ads is not hard, but the site is not as straightforward as it could be, so we’re here to help you figure it out.
The Internet Patrol is completely free, and reader-supported. Your tips via CashApp, Venmo, or Paypal are appreciated! Receipts will come from ISIPP.
CashApp us

Venmo us

Paypal us

First, you will need to apply to the Google Adsense Referral program, as it is currently in beta. You will find the link to apply for the Referral program within your Adsense account home page.
Next, once approved, in order to set up your Google Adsense Referral ads, go into your Adsense account and select “Adsense Setup”. Next, under “Products”, select “Referrals” and then select your language of choice (ours was “English”).
The next screen will show you both your ad “shopping cart”, and the list of categories of ads from which you get to choose. This is where it gets a bit tricky. First, think of the “shopping cart” as “the ad space you are going to create.” Each shopping cart is actually the block of ads which you are creating to put on your site. You are going to end up with either an ad block, similar to a regular adsense block, or with a single line of text if you select text links. Think of the ad block and the “shopping cart” as one and the same – in the end you are going to end up with an ad block (shopping cart) for which you have selected ads to be displayed in the block. So for example, you might select a 200×200 adblock, a 336×280 adblock, or plain text links. Whatever you end up with – and no matter how many ads you select (you are allowed up to 15) per ad block (shopping cart) – the block will display only one ad at a time. Your ads will rotate through the block or text link. So even if you have selected more than one ad or advertiser, each time your page is displayed, only one of those ads will appear in that particular ad block. The good news is that you can have more than one Referral ad block per page (in fact we’ve seen as many as four with no adverse impact, and no impact on regular Adsense context ads on the same page).
The main screen:

The ad block choices:

Here, you can see that we have selected a 336×280 ad block, and we are looking at the “Business” category of ads.

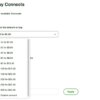
Next, we are going to select the advertiser “AAAA Advertising News”:

Selecting that advertiser has caused them to be added to our “shopping cart”, which means that they will appear in the ad block:

Note that “pick best performing ads” is pre-selected. If you want all of the ads you select to rotate through your block, you will want to uncheck this. It’s unclear yet whether “pick best performing ads” means serve up the ads that perform the best on your sites, or across all sites, which is of course very different.
You can add up to 15 ads to your shopping cart (meaning that up to 15 ads can be rotated through that ad block). You can choose more than one ad from an advertiser; each ad counts towards your total 15 limit.
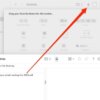
A note: Be very careful here, because at the bottom of each list, there are two sets of buttons. Because Google is using frames here, it is very easy to partially obscure the buttons that actually take you to more advertisers (which say “Next Page” and “Previous Page”) and instead to accidentally hit the “Continue” button, which will instead take you to the place where you set up your colors and channel.
Partially hidden “Next Page” buttons:

How it should look – click “Next Page” not “Continue”! at this point!

If you accidentally hit the “Continue” button, do not use the back button on your browser! You will LOSE everything. Instead, find the “Back” button on that next page, and use that.
You also want to be very careful while selecting your advertisers, because once added you can’t remove them; you have to go to square one and start the whole process over again! And once an ad block is created, you can’t edit it; again, you have to start all over.
Once you are done selecting the ads you want for that particular ad block, now is the time to press that “Continue” button. At this point you will be at a page that you will probably recognize – the place where you set up your color scheme for your ads, and assign a channel. Once done with that, press the “Continue” button again, and you will be given the code to put on your site.
As you can see here, we have selected three advertisers for our sample block – we are ready to hit the “Continue” button to set up the code. Note that the “Continue” button under the shopping cart and the “Continue” button under the advertisers list both take you to the same place – the next step.

As you refresh the page, you should see the three ads we selected cycle through it. Now, we left this at a 336 x 280 size to show you both that regardless of how much space there is, only one referral ad will be displayed at a time, and that because of this, you will want to play with the various ad sizes and how they integrate into your site.
And, of course, because you get paid on conversion (sale or lead sign-up) with Google Adsense Referrals, rather than per click, you have to rely on the advertiser to be very good at converting the leads that you send their way. So monitor your revenues closely, and even check out the landing pages to which you are sending these leads.
Was this article helpful? Let us know!
The Internet Patrol is completely free, and reader-supported. Your tips via CashApp, Venmo, or Paypal are appreciated! Receipts will come from ISIPP.
CashApp us
Venmo us
Paypal us


Please tell me how to find google adsense sign up button to add it on my blog