This is the continuation of a previous post. You can find it here.
We’re talking iPhone notification settings, how-to’s, and tips for making your iPhone work for you, instead of the other way around.
Last time we covered how to change your ringtone and other standard iPhone alerts that come built into your device. We also glossed over how to change the vibration pattern that your iPhone emits when receiving notifications. Now we’re going to get a little bit more advanced and cover how to customize your settings for specific contacts so that when that particular individual calls you (or texts you) your iPhone plays a specified alert tone, different from your standard tone. This is helpful for contacts that you interact with frequently. It is also helpful for readers who share a personal and work phone. You can customize your personal contacts to ring one way, and your work contacts to ring a different way.
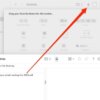
First, decide which contact you’d like to have a custom ringtone set up for. Once you have figured that part out, find their contact card. You can do this by finding their name in the Contacts app or Phone app. Or it might be easier to locate from your text messages. If you’re Messages, select the conversation with the contact you’re thinking of. Then click on their photo or icon with their initials in it at the top of the screen. From there you’ll need to click “Info” on the right side of the screen.
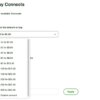
Now you should be on their contact card. There should be an option to “Edit” that contact in the top right corner. Once you are in editing mode, there will be an option for Ringtone and Text Tone. You will find yourself on the same list of different ringtones and text tones that we discussed in my last article. You can now listen to all your tones your iPhone has to offer, maybe even take a look at what tones the iTunes Store has… When you settle on one make sure it has the check mark next to it before selecting “Done” in the top right corner of your iPhone screen. But you’re NOT done! You must hit “Done” again from the Contact card in order to save your selection.
The Internet Patrol is completely free, and reader-supported. Your tips via CashApp, Venmo, or Paypal are appreciated! Receipts will come from ISIPP.
CashApp us

Venmo us

Paypal us

The Internet Patrol is completely free, and reader-supported. Your tips via CashApp, Venmo, or Paypal are appreciated! Receipts will come from ISIPP.
CashApp us
Venmo us
Paypal us