
Almost nothing is more frustrating than spending two days keeping your Macbook laptop in one location while it does a first-time Time Machine backup to your Time Capsule – especially when it’s not really a first-time backup, because you already have a perfectly good backup on your Time Capsule but your Macbook Air or Macbook Pro won’t recognize it, so it starts all over. We say “almost nothing” because what is even more frustrating is waiting that two days, only to have the backup stop before the full backup is complete, and having to start all over. Or completing that full backup, and then Time Machine still can’t connect to the new full backup, and wants to start another new one. If any of this has happened to you, here are simple, step-by-step instructions for what worked for us to force Time Machine to both complete a full backup to a Time Capsule, and to recognize that backup and use it, after going from OS X Lion 10.7.5 to Mountain Lion 10.8.2.
[NOTE: If you have new Mac or Macbook computer – or new logic board – you actually will have to make a complete new Time Machine backup, as we explain here. But you should be able to have that new full backup actually complete, and you should be able to then have your new computer use that new full backup for incremental backups, instead of having to keep making new full backups! So if one of these is your problem, read on.]
Now, again, this is what worked for us, and there is no guarantee that it will work for you. In fact, you should only try this if you have already tried everything else, and nothing has worked. And you should only do this if you know what you are doing! We make no guarantees either that it will work for you, or that it won’t make things worse. So proceed at your own risk.
Also, this is not for the faint of heart. If you are not comfortable with – and familiar with – things such as “terminal” and “sudo”, then find someone who is to do this for you.
Our setup was this: we were running Time Machine over our wifi network to a Time Capsule that was plugged into our wireless router. This setup had worked beautifully for years with our Macbook Pro, running OSX Lion 10.7.5.
The Internet Patrol is completely free, and reader-supported. Your tips via CashApp, Venmo, or Paypal are appreciated! Receipts will come from ISIPP.
CashApp us

Venmo us

Paypal us

Then, for issues completely unrelated (but having to do with the Macbook Pro) we needed to pick up a new laptop, and we got a 2012 Macbook Air, running Mountain Lion 10.8.2.
That’s where the problems started.
Even though we ported everything, including all settings, from the old Macbook Pro to the new Macbook Air, and even though the Macbook Air using all the old settings instantly found our Time Capsule, it would not just pick up backing up where we had left off. Then we remembered that when you have a new computer, you will have to make a fresh, full Time Machine backup.
Ok, we were cool with that.
What we weren’t so cool with was that over the course of nearly a week, Time Machine would get to nearly done with the new full backup, and then it would…stop. And we would have to start all over again.
We also noticed that whenever it would stop after almost fully completing the backup, the next time we started a new backup, it would be excrutiatingly slow – as in “estimated time remaining 186,182 days” (we are not exaggerating), rather than the still agonizing but more reasonable “estimated time remaining 2 days”.
Anyways, here is how we solved all that.
But before anything else, turn Time Machine off on your computer:

Ok, here we go:
NOTE 1: Connect your Time Capsule to your computer directly by Ethernet. Do not attempt to do this over your wireless network. That is the first thing that will make a difference. If you have a Macbook Air or other newer Mac that does not have an Ethernet port, go to your nearest Apple store and tell them that you need an Ethernet-to-Lightning adaptor. Yes, they have them, but somehow they never think to suggest that you use one. You will have to ask for it.
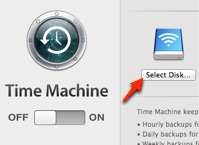
NOTE 2: You may or may not need to help your computer find your Time Capsule all over again. To do this, under Time Machine preferences go to the Time Capsule “Select Disk…” setup:
If you continue having problems at this stage, try setting your Time Capsule up as if it is a new Time Capsule (even though when you hit “Select Disk…” you will see your Time Capsule, pretend it’s the wrong one, and select “Other Time Capsule”).
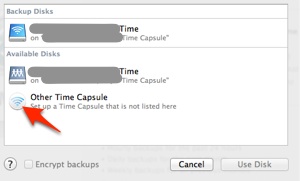
This will, among other things, let you update your Time Capsule if there is an update available:

Ok, now that you have your Time Capsule connected by Ethernet, to start, if you are at the 186,182 days for a backup point, here is how we fixed that (otherwise skip down):
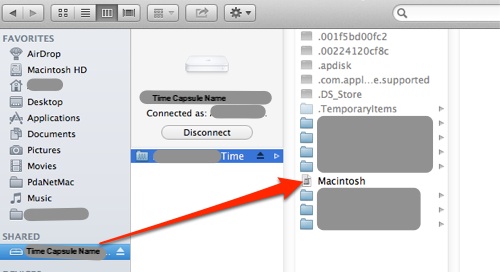
Connect to your Time Capsule in finder – it will be under the “SHARED” section:
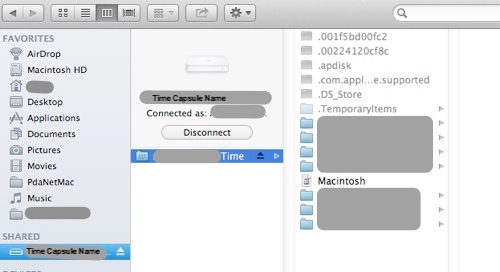
Then, look for files that look like the Macbook or Macintosh file or the Macbook.sparsebundle files that you see in these pictures.
![]()
And delete them. Now, depending on how big your backup files are (more stuff on your computer equals bigger backup files) it may take several minutes for the file to delete.
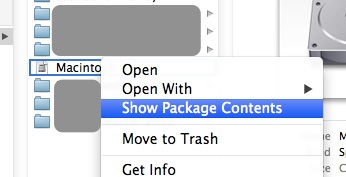
If the file seems to hang, you can go into that file (which is actually a “package” containing lots of directories and files) by control-clicking on the file, and selecting “Show Package Contents”:
…which will reveal those directories and files. Go into the directory “bands”:
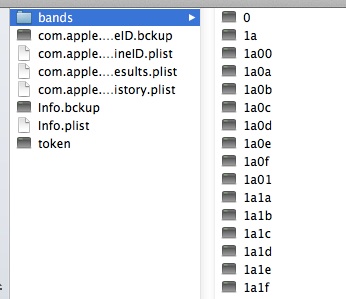
..and delete individual files, a bunch at a time, until all files in the bands directory are gone, at which point you can back out and delete the backup package file easily.
Honestly, from our experience, even if you aren’t having the “estimated time remaining 186,182 days” problem, deleting any sparsebundles will make things more likely work.
[NOTE: If the above made you squeamish, then this is not the article for you, as we are about to do things that are even more power-user’ish.]
Having deleted all of these previous backups and backup attempts will allow you to start a new backup and not have it take thousands of days to complete.
BUT BEFORE YOU START THAT NEW BACKUP here is something that you need to know:
For some reason, at least under the configuration of Mountain Lion, and some Time Capsules, your Time Capsule will suddenly become a power hungry power hog.
It needs to be plugged into an outlet all by itself, not sharing the outlet with any other device.
We don’t know why this is, this is just what our research turned up, and it was what made the difference for us in terms of Time Machine finally completing a full backup without stopping part way through.
Once we plugged our Time Capsule into a wall outlet all by itself, with all of the other (now unusable) backup files delete, it finally did a full backup.
Yay, we were so happy. Then it did its next incremental backup. Yay again!
So, we moved the Time Capsule back over to our wireless router.
Next incremental backup? No way! It didn’t see the backups, and once again started to do a brand new full backup!
This just wouldn’t do – no way were we going to have to keep tethering our Time Capsule by Ethernet just to keep our Macbook Air backed up. The whole point of running Time Machine to a Time Capsule over wireless is the convenience factor and, more importantly, because you know that your data is being backed up regularly without your having to think about it!
Plus, this setup had worked flawlessly for years with our Macbook Pro. So, WTF?
More research – and desperation – led us to try lots of things, and here is what finally worked to force Time Machine on our Macbook Air to use the full backup that it had just created hours before.
First, go back to your Time Capsule in Finder, and find your full backup package (unless you caused it to be named something else, it will be called something like “Macbook” or “Macintosh”):
Now, this time, instead of control-clicking on the file, double-click it as if you are going to open the file – this will mount your backup in Finder, under the “DEVICES” section – it will probably be called “Time Machine Backups” or something similar – and once it loads you will see a folder called “Backups.backupsdb”, and in that folder, another folder called “Macintosh” or “Macbook” or such:
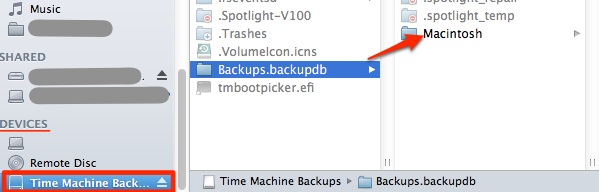
You do not need to go any deeper than that Macintosh folder (or whatever it is called on your Time Capsule).
Now, open a terminal window. If you don’t know what we mean by this, you should not be doing this. Find your geekiest Mac-using friend, and have them do all of this for you.
Copy and paste the following line in at the terminal prompt, but do not hit enter yet:
sudo tmutil inheritbackup
Now, go to your Finder window, and drag the backup folder (the folder that is within the Backups.backupsdb folder) to your terminal window – the purpose is to add the file path for that backup folder to the end of the “sudo tmutil inheritbackup ” line:

Now the line will look like this:

..at which point you should hit “enter” to execute the command.
And that’s it. You’re done.
Astonishingly, when we turned Time Machine back on after doing this, instead of telling us that it would need 2 days to create a brand new, full backup, it found the backup it had just done hours before, and – fingers crossed – Time Machine has now been faithfully doing incremental backups to that full backup, across our wireless network, just like it used to.
Again, this is what worked for us, it may or may not work for you. Proceed at your own risk.
Finally, a huge thanks to Pondini.org, where we found the information about the tmutil inheritbackup command.
The Internet Patrol is completely free, and reader-supported. Your tips via CashApp, Venmo, or Paypal are appreciated! Receipts will come from ISIPP.
CashApp us
Venmo us
Paypal us