If you are wondering how to delete a Facebook page in 2022, you’re not alone. You really can’t be blamed for not being able to figure out how to delete a Facebook page, because Facebook has made deleting a page so well-hidden, it’s almost like they don’t want you to figure out how to delete a Facebook page! So we uncovered it, and are laying it out in a step-by-step tutorial for you (nyah, nyah, Facebook!)
We’re not going to pad this article with a lot of unnecessary text (we hate it when other sites do that), so here, without further ado, are the 10 steps to deleting a Facebook page.
The 10 Steps for How to Delete a Facebook Page
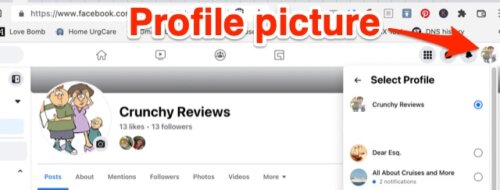
Step 1: Switch to the ‘profile’ of the page you want to delete
In order to delete a Facebook page, at least now in 2022 (it was different before) you need to actually switch to the profile associated with that page (did you know that there was a separate and distinct profile associated with the page?) To do this, click on your own Facebook profile picture in the upper right-hand corner, and you will get a dropdown menu of all of the profiles associated with your primary account.
As you can see, for this tutorial we are deleting the page called Crunchy Reviews.
The Internet Patrol is completely free, and reader-supported. Your tips via CashApp, Venmo, or Paypal are appreciated! Receipts will come from ISIPP.
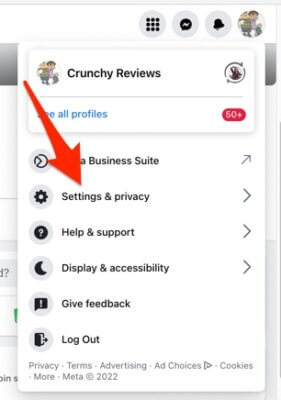
Step 2: Click on Settings & Privacy
Click on the Settings and Privacy section. And then don’t be surprised when you have to click on something very similar again.
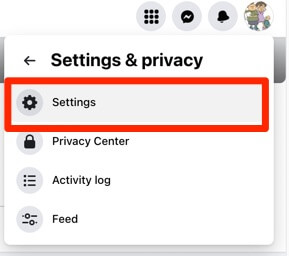
Step 3: Click on Settings
Click on Settings (see, we told you – similar, maybe even confusingly similar).
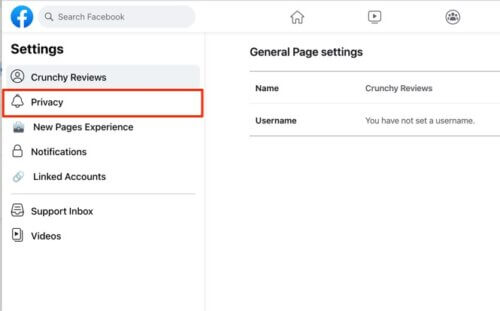
Clicking on Settings will open up a new sidebar on the left side (up until now you’ve been clicking on dropdown menus in the upper right-hand corner). Go to that new lefthand sidebar.
Step 4: Click on Privacy
Yes, we know that it’s entirely counter-intuitive, but on that newly-opened lefthand sidebar click on ‘Privacy’.
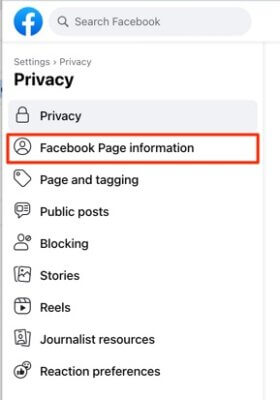
Step 5: Click on Page Information
Once you are in the Privacy area, click on ‘Page Information’. Again, counter-intuitive as hell. If you are confused as to why Facebook is burying all this here, it helps to keep in mind that you and your page are the product that Facebook is selling to advertisers, and the more people they can keep scrolling and clicking around on Facebook, and the longer that they can keep them there, the more they can charge their advertisers and the more money they will make. Your page is part of that grand scheme. Even more pointedly if, for example, you have a page about how to bathe cats, then they can tell their veterinary, grooming, breeder, and pet supply advertisers that they have an audience for them, and part of that audience is the people who visit your page on cat bathing. Is it any wonder they make it difficult to figure out how to delete that page? (Facebook itself admits that their data mining is a problem.)
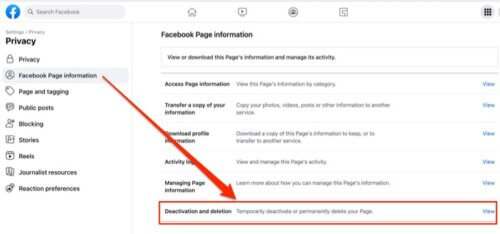
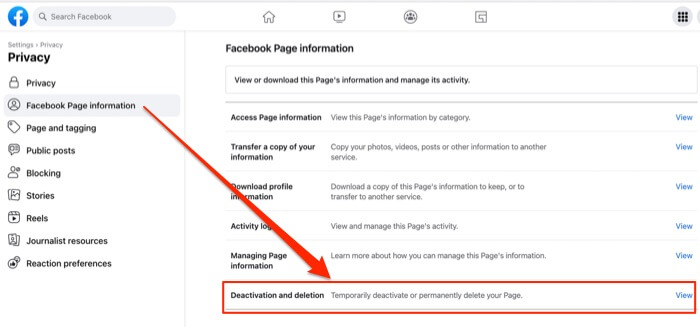
Step 6: Click on Deactivation & Deletion
From the Facebook Page Information screen, go all the way down to the bottom and click on ‘Deactivation and deletion’. (Now we’re getting somewhere!)
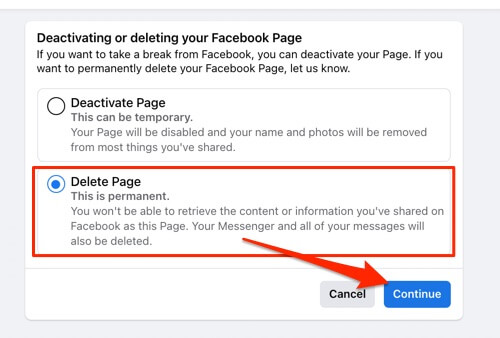
Step 7: Select Delete Page and Continue
Here you are presented with two options: to deactivate the page or to delete it. Select ‘Delete’ (unless, of course, you’d rather deactivate the page).
You would think that at this point, when you click ‘Continue’, that you would be able to, you know, delete your page. But you would be wrong. You still have 3 steps to go.
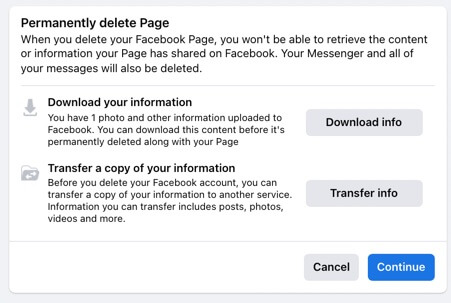
Step 8: Take the Opportunity to Download or Transfer Your Page Information
After clicking ‘Continue’ in step #7, you will be given the opportunity to either download or transfer your page information. If you want to do this, go ahead, then click ‘Continue’ to get on with the page deletion.
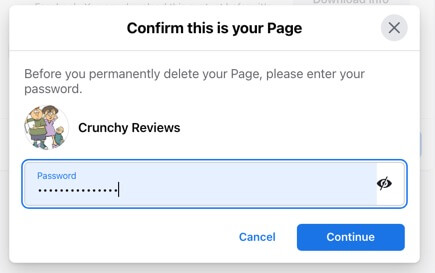
Step 9: Confirm the Deletion with Your Password
You’re in the home stretch now!
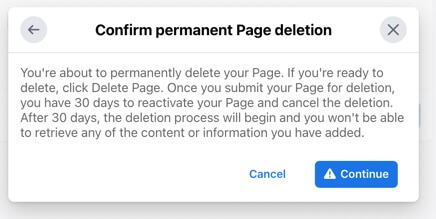
Step 10 (at last!): Confirm Page Deletion
Click ‘Continue’, which in this case actually means “Confirm”.
And that’s it, with no fanfare… you’re done! The really crazy part is that when we say with no fanfare, we really mean with no fanfare, in fact with no confirmation that the deed has been done! Zip. Nada. Nothing. The way you know that your page has been deleted is that upon hitting ‘Continue’ you will be taken back to the Facebook homepage, and your page will no longer be available.
Congratulations.
Note: On the off chance that your Facebook page is still the old ‘classic’ style, and hasn’t been borged updated to the new version, Facebook has instructions here for how to delete your Facebook page – Classic version
The Internet Patrol is completely free, and reader-supported. Your tips via CashApp, Venmo, or Paypal are appreciated! Receipts will come from ISIPP.
