Setting up Google authorship when you have a site with multiple authors is easy – once you know how. Here is a step-by-step tutorial in three steps for how to set up Google authorship for a site with multiple authors. For the purposes of this article, we are going to refer to the WordPress CMS (Content Management System), but the steps should be similar for any CMS.
Before starting, have the authors include a link to your website in their “Contributor to” section of their Google+ profile (this is found in the “About” section of their profile, under “Links”), and get the link to each of the authors’ Google Plus (“Google+” or “G+”) pages. If your authors don’t have Google+ pages, encourage them to set one up so that they can claim the authorship for their articles on your site. A G+ page link looks either like this:
https://plus.google.com/109362511029960405687
Or like this if the account holder has claimed a name URL:
https://plus.google.com/+AnnePMitchellEsq/
The Internet Patrol is completely free, and reader-supported. Your tips via CashApp, Venmo, or Paypal are appreciated! Receipts will come from ISIPP.
CashApp us

Venmo us

Paypal us

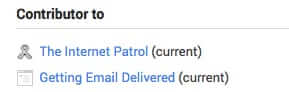
The “Contributor to” section looks like this:
It’s not surprising that Google requires the use of a Google+ account in order to claim Google authorship. They are, of course, continually trying to boost the use of Google+, and it is a good way to confirm that the authors are who they say they are. This is because in addition to requiring a Google+ account, Google requires that the website for which authorship is being claimed include a link to eachauthor’s Google+ account. Yes, that is promoting Google+, but it also demonstrates that someone who is actually associated with the website claims that the person with the Google+ account is an actual author on that particular site.
Ok, so now that the authors for your site have their Google+ accounts set up, and have given you the links to their accounts, let’s get started.
Here are the steps, and below we go into step-by-step detail:
Step 1. Put the author’s Google+ link, along with the rel=author code, in the author’s profile on your website.
Step 2. Make sure that your articles include an author byline, and that the byline links back to the author’s Google+ profile including the rel=author appended to the end of the URL.
Step 3. Include on each page in the sidebar or elsewhere a list of all of your authors, including a link to their Google+ page. (While some instructions suggest that you only need the byline, which is of course how it should be, in tests we have found that this third step helps to ensure that the information is picked up by Google.)
Step 1. Put the author’s Google+ link, along with the rel=author code, in the author’s profile on your website.
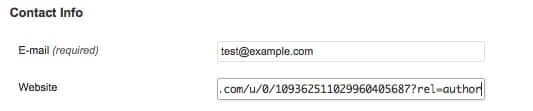
The “rel=author” code is how Google takes note that there is an authorship claim by the Google+ user. So to designate the Google+ user as an author, you have to include it at the end of the link to their Google+ account. You do this by adding “?rel=author” to the end of any link to their Google+ account.
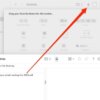
So, in the author’s profile (user) section on your site, in the area where you can provide a link to “their website”, put the link to their Google+ account, with “?rel=author” at the end:
In WordPress you do this by going to the Users area, and editing their provile.
Save the user profile.
Step 2. Make sure that your articles include an author byline for each author.
The next step is to make sure that the articles on your site include an author byline, and that the byline links back to the author’s Google+ profile including the rel=author appended to the end of the URL.
In WordPress, the author_link code will automatically use the link that you have set up in the author’s (user’s) profile, which is now their Google+ rel=author link.
So in WordPress, the code to display the author’s name (byline) as a link to “their website” (their Google+ link with the rel=author code) is:
<?php the_author_link(); >
As you can see from this article, we have put the author byline directly under the title of the article.
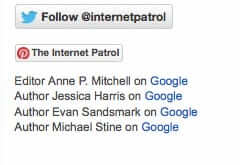
Step 3. Include on each page a list of all of your authors, including a link to their Google+ page.
As we mentioned above, we have found that this helps to ensure that the information is picked up by Google, even though you would think it shouldn’t be necessary and the byline should be sufficient. Your mileage may vary, so feel free to play with this step.
The link to the author’s Google+ page of course needs to include that rel=author language.
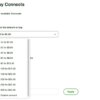
As you can see on our site, we have links to all of the authors’ Google+ pages in the sidebar:
Once you are done, you can use this Google tool to test whether you have it set up right.
If it is set up correctly, it will give you results like this:
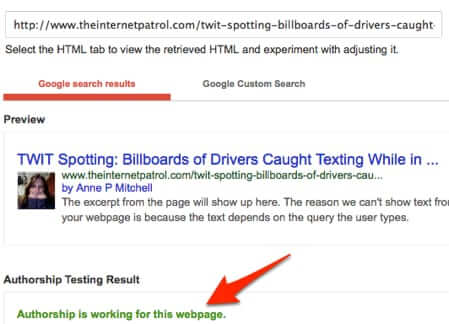
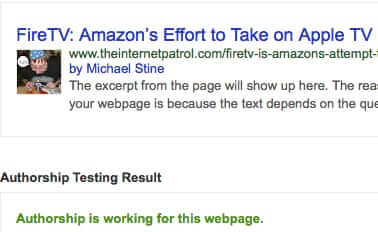
As you can see, those are results from two of our articles, with two different authors, and Google is correctly recognizing each.
To recap, to set up Google authorship for a site with multiple authors:
Make sure that your authors have their Google+ profiles set up, and that they have listed your site in their “Contributor to” section.
Then:
1. Put the author’s Google+ link including the rel=author code in the author’s profile on your website.
2. Include an author byline, linked to their Google+ page with the rel=author code, in your articles.
3. Put a list of authors, including a link to their Google+ page with the rel=author code, on all of your pages.
The Internet Patrol is completely free, and reader-supported. Your tips via CashApp, Venmo, or Paypal are appreciated! Receipts will come from ISIPP.
CashApp us
Venmo us
Paypal us